Feeds:
Posts
Comments

Archive for the ‘Tutorials’ Category

Both the kind that grows on trees AND doesn’t.

There are a few simple and inexpensive “green” things you can do in your house which will make you feel warm and fuzzy inside while you save the planet and some dough. A programmable thermostat can save your a few hundred buckaroos every year, with models starting at about $30. We just installed 2 in our house, and I’m going to show you how.

First you’ll need to decide what kind of stat (that’s what all the cool kids say) you want. If you check them out at the store, you’ll notice several types labeled as 5-2 or 5-1-1 or even a 7 day.

The translation goes something like this:

5-2: A  program for M-F and a separate one for Sa/Sun

5-1-1: A  program for M-F, and separate ones for both for Saturday AND Sunday

7 day: A separate program for every day of the week.

Take a minute to think about the schedules you keep, and decide which one is best for you. I should add that as you go down the list, the price increases. For most people (including us), I’d imagine the simple 5-2 will be sufficient. You’ll also need to know if your HVAC system has emergency or auxiliary heating. Check your manual, or even your existing thermostat to find out. We have auxiliary heat, not emergency. The packaging of the stat will tell you if it’s compatible with one or both of those options. Look carefully, because we bought the wrong one initially.

Since we already had a Honeywell, we ultimately ended with another Honeywell- the RTH2300B, 5-2 model which is compatible with auxiliary heat.

To install a new thermostat, first take the face plate off your existing model.

Take note of the wiring, it’s likely color coded, but jot down the positions just in case.

Then, remove the wires by loosening the small screws.

Loosen the screws holding the base to the wall and slip it off.

Install the new base over the wires and attach it to the wall. Reattach the wires in their appropriate location (follow the wiring diagram provided with your stat if needed).

Add the cover, and you’re all set to go! Most of these come with a built in default program, so just set the time/day and try it out for awhile. If you find that you need to make adjustments to the program, check out your operating manual for the how-to.

Take comfort in knowing you added value to your home while saving some green!


Read Full Post »

Let me preface this by saying that while I’d rank this about a 4 on a scale of 1-10 for difficulty, this project is not for the faint of heart. What it requires is a time investment (think 1 week, minimum) as well as a great deal of patience and attention to detail.

However, if you are tired of your ho hum builder grade cabinets…this is the perfect way to customize them for an upscale look. You may remember that I had already repainted and tiled the backsplash, so this was the final step in the transformation!

Here’s what you’ll need:

  • Paint and primer (more on this to come)
  • Nice brushes
  • Sandpaper (both fine and medium grit)
  • Degreaser or TSP
  • Painter’s Tape

Like any good home improvement project, it starts with agonizing over choices. In our case, I knew I wanted to paint the cabinets white, but who knew there were about 100 million shades of white? After taking a few samples home, I decided on Benjamin Moore’s White Dove (not to be confused with Dove White).

Now normally I’d take my swatch down to Home Depot or Lowes and get a color match, but this is not a job for ordinary paint. Think about the banging, food slinging, moisture, and heat that your cabinets are subjected to. As a highly visible and frequently abused kitchen element, you definitely want these babies to come out smooth and durable. After much research and speaking with several paint experts, I decided to go with a new product by Benjamin Moore, “Advance” in a satin finish.

I did come across stories of good results with BM’s Satin Impervo (both oil and waterborne) as well as Aura. There are also several specialty paints made for cabinets, but they are not always easy to find. After a recommendation from their staff, I decided to give this oil/water hybrid product from BM a shot. I purchased some nice brushes, a gallon of their Fresh Start All Purpose Primer and was on my way.

Once you gather all your supplies, the next step is to take down all your cabinet doors and drawer fronts and remove all hardware/hinges. If your kitchen has a complicated layout, you may want to label what came from where to make the re-install less of a headache. Otherwise, get out your cleaning and sanding supplies.

You might be tempted to rush into painting, but let me warn you that your finished product depends entirely on this prep work. Clean your cabinet boxes and doors thoroughly and give them a good roughing up with some medium grit sandpaper/block. My cabinets had a glossy veneer which I didn’t sand completely through-I just sanded enough to take the sheen off and give the surface some grip. Be sure to wipe away the dust with a tack cloth or damp lint free cloth.

Once your cabs are clean and stripped (hehe), give them a coat of primer. For the best adhesion, let the primer cure for a full 24 hours. Patience is a virtue, my friends. The following day prime the back side of the cabinets. To save some time, I actually painted a first finish coat on my boxes the same day. Are you starting to see the pattern here? It’s a whole lot of painting and a whole lot of waiting. Once the back side primer is dry, turn the doors over and give them a light sand with some fine grit sandpaper.

If this is all getting a bit confusing, let me lay out the order like this.

Day 1- Clean, sand, prime boxes and front of doors

Day 2- Lightly sand boxes and put on a first finish coat, prime back of doors

Day 3- Lightly sand front of doors and put on a first finish coat. Lightly sand first coat on boxes and paint a second (and final) finish coat.

Day 4- Lightly sand back of doors and put on a first finish coat.

Day 5- Lightly sand first coat on front of doors and put on a second coat.

Day 8 or 9 or if you have a ton of time Day 10- Reattach hardware and re-hang doors!

Before you get started, let me detail the painting technique I was shown at Benjamin Moore specifically for the Advance paint. It’s designed to flow like oil, so you don’t want to overwork it. Put a good amount on your brush and use long strokes to spread it as evenly as possible. Let it settle itself, try not to go back and brush it too much because it will start to set up in a few minutes. The good news is that you effectively have one practice coat to see how the paint feels and flows. By the second coat, you should be a pro!

Despite all the work, the result is totally worth it. First, let’s look at those boring they-fell-off-the-contractor’s-truck boxes.

After a brief stint as a disaster area…

The kitchen came together beautifully (if I do say so myself).

I also added some beadboard paneling in certain areas, which I’ll show you how to do in another post this week. So, what’s the verdict? You likey? Anyone else thinking about attempting this?

*******Shared On The Following Blogs********


Read Full Post »

When I started thinking about switching things up in my kitchen, one of the first things that came to mind was to add a tile back splash. I think it’s a relatively inexpensive way to make a big impact, next to paint. So after finding some inspiration in magazines, I set out to tackle my first tiling job.

But first, let’s take a look at my original black-and-cranberry bistro style kitchen.

And now for the transformation process. It started with painting the kitchen and dining room “Burnished Clay” from Behr (also used here). I didn’t waste any time painting the area that would end up being tiled.

Here’s what I picked up at the store:

Total  Materials: about $350

Every tile job is different, but you’ll likely need a variation of all these ingredients-be sure to check with the tile manufacturer or a friendly helper at Lowes or Home Depot.

If you’re using any kind of stone tile, you’ll likely need access to a wet saw. You can rent one for about $60/day, but I actually found a fairly cheap one at Lowes for $89.99. It was cheaper than renting for 2 days, and I figure I may use it again down the line. If you don’t have to make a lot of cuts, sometimes the place where you get the tile will cut it for you.

Once you get all your supplies, do a dry run of the tile to make sure you have enough and plan your cuts. Some sources will say to work from the middle of the wall out, but I thought that in my “U” shaped kitchen, most of the half tile cuts could be hidden in the corners. Just do whatever you think looks best!

Next, begin your prep…ready to use adhesive saves time, but mixing thin set is cheaper (just follow the mixing instructions on the bag). I’m not that great with consistency based results, so I chose to go the safe route with the mastic. Either way, you’ll need a trowel to apply it. Which one depends on your tile size, so ask someone in the tile department or check the manufacturer.

Now, I’m no professional, but I do watch a lot of DIY network. I had watched homeowners lay tile about 100 times, so I felt pretty confident in the technique. I’ll do my best to describe it, but there are plenty of videos out there on the internet if you want a demo.

****NOTE**** Be sure to turn off the breaker that controls any outlet you’ll be working around. You will need to take the wall plates off, so unless you want to test your luck-better safe than sorry.

Using the flat sides of the trowel, smooth on the adhesive in a large enough area to lay down a few square feet. The thickness of the spread depends on your tile. You’ll want to have enough so that the notched end of the trowel doesn’t cut all the way through to the wall-but not so much that it squeezes through between the tiles. It’s not an exact science, so just feel it out and you should have a pretty good idea of how much you need early on.

Then, using the notched ends, hold the trowel at about a 45 degree angle and go back over the adhesive. This will create ridges which help the tile to adhere.

Now you’re ready to lay your first tile! I’m using mesh backed tile which goes up 1 square foot at a time. For individual tiles the process is a little different because you’ll need spacers. Either way, just take your time and make sure your grout lines are as even as possible. With my tile, I decided to cut the mesh 4 bricks up to add a single row of accent tile. I also cut out the end tiles that needed to be cut in half to fit. That’s the beauty of mesh-you can really create any pattern you want. Here is the first section I put up.

I topped it with a strip of 5/8” mosaic tile that I cut from a large 1 sq ft sheet.

The rest of the sheet went up on top of the mosaic tile strip to complete the height as I continued down the wall, removing any bricks from the mesh that would need to be cut later.

When you come upon an outlet, you’ll need to make sure that you tile close enough to the outlet box so that the cover has good support. But whatever you do, don’t tile over the metal plates. When all the tile is done, the outlet box will have to be lifted out a bit to sit flush with the tile.

I laid all my tile and then began filling in the holes where cut tile would need to be added. Cutting tile can be intimidating, but if you give it a try you’ll see how easy it actually is.

First, mark your cuts. Straight cuts and “L” shape cuts are pretty obvious, so I’m going to show you the “U” cut.

I’ll admit it, at first glance I had no idea how to make this cut. Then I vaguely remembered something I saw on TV and had a total Eureka moment. What you’ll want to do is make many skinny cuts down to the marked depth…sort of like a comb. The stone is brittle, the little notches will likely pop out on their own as you cut. If not, you can take a small hammer to it lightly.

It’s not exactly perfect right off the saw, but a metal file will smooth it out nicely. When placing tiles individually into a hole, instead of putting the adhesive on the wall you should put it directly on the back of the tile. This is called “back buttering,” and the steps are the same-smooth a thin layer on first, then add the ridges.

Here we are with the outlet areas filled in. With natural stone, I found that the grout lines were not perfect so I cut up some cardboard to create some shims. Worked like a charm.

After all the tiles have been laid, it’s sealing time! Unless you’re using a pre-sealed tile, you will need to do this step BEFORE grouting. Follow the directions on your product, in my case I just wiped it on with a microfiber cloth and let it cure overnight.

It’s tempting to stop here. And I did, for 4 days. Grouting is, however, a necessary step. So enlist the help of a friend if you have to and just get ‘er done. Using the drill attachment mixer, follow the directions on your grout packaging and mix it up with water in a large bucket. Prepare a second bucket with cool, clean water for washing the face of the tile. The grout float is specially designed to help you get the grout in all those nooks and crannies. Just slather it on and move the float diagonally across all the joints. Don’t worry if you can’t get everything covered the first time. Work down the wall for a few feet, do a little clean up with a wet sponge, and then go back and try to get what you missed. It’s important not to use a saturated sponge, otherwise you may wash away some of the grout from your joints. Also, be sure to change the water frequently. It’s a messy process, but totally worth it. I let the grout cure for a full 72 hours, cleaning it several times with water, before wiping on the sealer again.

One last step- the caulking. I didn’t know that grout won’t stick to formica or laminate, so if you have one of these types of countertops you will need to do this step as well. Fortunately the same company that makes the grout I used also makes a matching caulk. Using a caulk gun, I spread it where the counter meets the tile and around the window sill. When everything dried, I couldn’t even tell a difference between the caulk and the grout.

For a totally pro finish, see if you can find coordinating outlet wall plates. To reattach a wall plate on top of the tile, you’ll have to bring the outlet out of the wall a bit. I found these handy spacers to hold it in its new place. Once pull the outlet out with the spacers, you might notice that your screws are now too short- that’s ok, just grab some of the 1 1/2″ variety from the hardware store. Now, attach your posh wall plate and admire your work!

It was a marathon week, but technically this can be done in a weekend if you’re really motivated. In any case, the final results are awesome. Check it out:

So, what’s the verdict? Do you like it? I definitely think it was easy enough for a beginner DIYer, so don’t be afraid to try this at home!

***********This post has been shared***************

Read Full Post »

Well, almost anything. It did fix this $1.00 ceramic bowl that I wanted to use in the guest bathroom.

I whipped out my can of Krylon Oil Rubbed Bronze to give it a makeover.

Read Full Post »

Tutorial: No Sew Pillow Sham

Alright, I admit it-I’m a total no sew junkie. The truth is that I can sew, in fact I once made a bridesmaid dress that I actually wore in a wedding. I own a sewing machine (thanks to my super sweet and supportive mother-in-law). So why do I continue to do projects like this (and this, and these) that require zero thread?

YOU!

Yes, you. Because I know that not everyone can sew. Not everyone owns a sewing machine, even if they’ve sewn in the past. And some of you are probably just as lazy as I am, and don’t want to go through the trouble of getting the machine set up and yada yada yada…the iron and Stitch Witchery just call to me, begging for a new project. And I obliged.

Here’s the deal, I love multifunctional things. Even when it comes to pillows. The fact is that our house is overrun with them (well, according my my pillow hating husband). So when I needed the perfect accent pillow for the bed in the guest room, I looked no further than my own stash.

I have 2 pale blue 12” square pillows that hang out in our room, either on the bed or in the chair. So I came up with this idea to make a sham that would hold both of them stuffed together to create a whole new look!

It was really easy to do, most of this should be fairly intuitive. Here’s what you’ll need:

Materials:

A pillow or two that you want to cover

Stitch Witchery Iron On Tape

Iron on Velcro (found at craft or fabric store)

Iron

Fabric, enough to cover pillow(s)

Pencil

Scissors

After you wash and dry your fabric, lay your pillow(s) down on the fabric, fold over the top (saving one side to “sew”) and trim to fit with about 2″ to spare around the edges. Next you’ll want to hem one side with your tape. I always start by ironing a crease, then tucking the Stitch Witchery in and ironing again.

no sew hem

Now fold the fabric in half, and “sew” the side together with your tape.

hemming ends

Tuck your pillow(s) in the new pocket to ensure fit and mark the corners with pencil.

measure your fabricmark the fabric

The tape I used is 5/8″, so I hemmed the fabric on both sides to leave about that much BELOW the mark.

no sew hemming

Join the sides together down to the end where you’ve marked your other corner.

Now, for the last side, you’ll be using velcro. This was my first time using the iron on velcro, but it worked great! Cut 2 “sets” of strips to space out over the length, or really you can just arrange the velcro any way you want that works for your pillow.

iron on velcro

cutting velcro

placing velcro 2

I ironed one side at a time, you want to iron through the fabric, i.e. not directly on the velcro.

Tuck your pillows in, and admire your no sew handy work!

no sew pillow sham

Now my pillows do double duty, and this yellow beauty is a welcome pop of color!

****Linked Up****

Read Full Post »

It sounds easy, right?

To get professional results, I’ve compiled some tips for any homeowner to use. You CAN tackle painting without fear. The great thing about paint is that it can always be painted again. It’s one of the quickest, cheapest, and noncommittal ways to change the way a room looks.

First step: choose a color

I like to pick out a bunch of paint swatches and tape them to the wall. Look at them for awhile, in different lights, and see if anything jumps out at you. Remember that paint looks different depending on the room, time of day, and colors surrounding itself.

While you’re pondering, try this trick. Start taping off your trim or any walls that you’re not planning to paint. I like to do this in advance because I find when you have the paint in hand it’s easy to rush through this important step. Taping off a few days before you plan to paint will save you time on painting day and lead to better results. Plus, it builds the excitement! Well, maybe that’s just me.

Taping trim for paint

When you find a color that you can’t keep your eyes off of, you can have it color matched to whatever paint brand you like. Just take your swatch to the paint department and they’ll match it exactly! Home Depot and Lowes offer affordable paint, as well as Walmart. I have purchased paint from higher end companies like Sherwin Williams, and I don’t find it to be much different than any of the other stuff out there. When it comes to finish, I have switched completely to flat or flat enamel (in my living areas). I was totally a victim of the old rhetoric that satin or eggshell is standard for living areas, with a semi-gloss in the kitchen and bathrooms. The first time I needed to touch up the paint however, I noticed that I left a glaring mark! When the sun hits the wall you can totally see a large blotch where I had to touch it up. UGH! The only way to avoid this is to use flat paint. Maybe it’s not as scrub-able, but as someone with 4 animals-I just prefer touching up. And, if you have kids, wouldn’t you rather just paint over that magic marker than try to scrub it off??

So now that you’ve gotten your paint, let’s get started!

What will you need? Possibly a primer, depending on what color is already on the wall. I used one when I covered the bright orange in my bedroom. Some paint manufacturers make a primer-and-paint-in-one. You’ll also need a high quality roller made for walls (try 3/8” nap for most paint), a small trim brush, a paint tray, and this super duper handy tool:

The Shur-Line Edger

It comes with a disposable pad and allows you to crawl right up against your tape for a perfect edge.

The technique:

I like to edge and roll simultaneously to be sure there are no lingering lines. The trick is to always be rolling into a wet edge left by the Shur-Line, so only work in about a 3×3 area at a time. Use the edger, then roll into the line making “W” shapes along the wall.

paint edging and cutting in

I’ve tried many other things, and this technique seems to give the best results with the least amount of touch ups!

I hope these helpful tips save you some of the hassle I’ve been through trying to learn on my own. And, they’ll save you some dough since you won’t have to hire a professional!

Read Full Post »

I saw this over at Design*Sponge, and totally loved it! Who would have thought that such a mundane object could turn into a piece of original wall art!

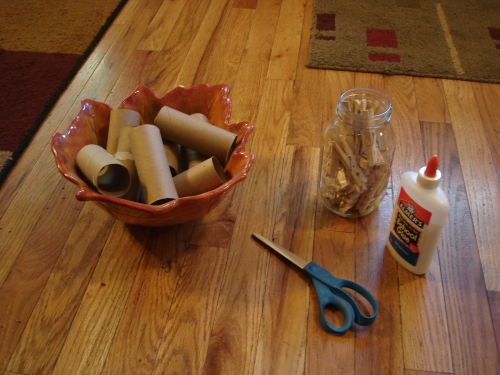
First, gather your tools. I spent a few weeks gathering toilet paper rolls- the more you have, the better. This would make a great craft for kids as well as something super green and easy for adults to do as wall art.

Tools:

  • Toilet paper rolls
  • Scissors
  • Glue
  • Clothes Pins

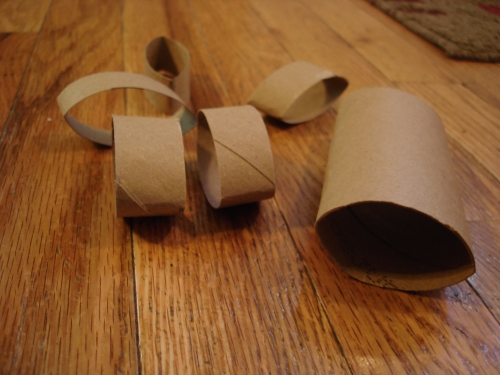
Start by crushing the rolls, then cutting them into 5 pieces. This will give you thin oblong rings.

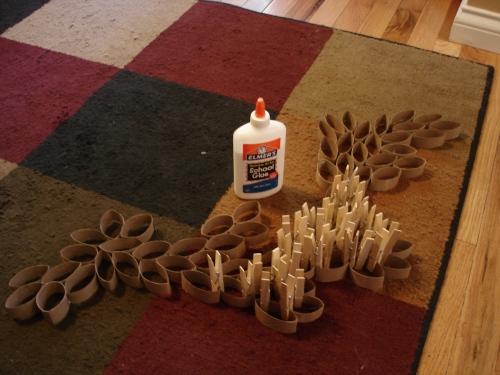
Get set up on a large work surface. I just sat on the floor because….well, that’s just what I do. But the kitchen table works fine too! Start playing around with the rings in certain patterns, when you find one you like begin applying glue where the rings touch and holding them in place with clothes pins to dry.

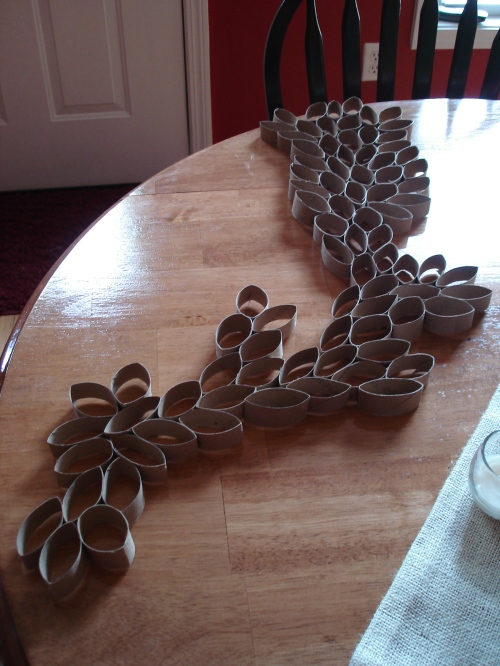
Keep going until you have glued all of your rings together. I am planning on adding more to mine (which is why the end looks weird) when I get more rolls, but here it is now! I’m creating a piece for an accent wall in my living room.

So start saving those cardboard beauties and bust them out on a rainy day with your kids or when you feel like redecorating!

Read Full Post »

Last week I picked up this stool in need of a major face-lift.

how to reupholster a custion on stool or bench

I wasn’t too sure where this little treasure would live in our house, so I decided to stick with neutral colors. I had some extra painter’s drop cloths from another project, so I decided to use that to recover the top. It was super easy, and only took about 5 minutes. Here’s how I did it.

Materials List:

  • Fabric
  • Staple Gun
  • Cushion

Lay your cushion face down on the fabric and cut the material large enough to wrap around the edges.

reupholster cushion on stool or bench 2

I stapled the fabric down each flat side, leaving the corners open to finish later. Just make sure you are pulling the fabric taut as you staple.

reupholster cushion on stool or bench 3

There are a few ways to work in the corner fabric, but I just decided to go with the “wrap like a present” approach.

reupholster cushion corner on stool or bench 4

reupholster cushion on stool or bench 5

After sanding, priming, and painting the bottom half of the stool, here’s the end result. I love the huge contrast between the dark and dreary before and the bright after. Plus the colors are so neutral I could use this in our master bedroom or in the office/guest room.

reupholster cushion on stool or bench 6

Read Full Post »

Tutorial: Burlap Runner

When I was looking for something simple and textural for my kitchen table, burlap was the first thing that came to mind. My table is on the smaller side so I liked the idea of a custom runner.

burlap table runner

Totally charming and perfect. Here’s how you can make your own!

Materials List:

  • Fabric
  • Stitch Witchery/Iron Hem Tape (or sewing machine if you want!)
  • Fabric glue/Fray Stopper
  • Scissors, Iron, Tape Measure

Decide on a width and length for your runner-you want it to hang about 6 inches off the table. Don’t forget to account for hemming (I did 1 inch on each edge). If you want to add a ruffle trim like mine, you’ll want to account for that also as it will be added after the main body is done. But this isn’t an exact science, and I doubt the table runner police will arrest you if it’s slightly longer or shorter so don’t freak out too much.

Cut the fabric for the main body of the runner and get your iron ready!

You’ll want to hem all four sides, I use a foldover style hem where I fold about 1/4” down and iron a crease, and then fold it over again and use the Stitch Witchery to create the hem there. That way there are no visible frayed edges. You can find more details on that here, but it should be pretty simple-just do whatever style hem works best for you!

Next, the ruffle. Now if you’re not into the ruffle you can totally leave it as it is. You’ll have a great classic custom runner! But if you’re into the sweet detail, here’s how to do it:

Because of the ruffling action, you’ll want to cut a piece of fabric about twice as long as what you cut for your main body. The width is up to you, just keep in mind you’ll need to hem a bit on each edge. Cut two pieces, one for each end of the runner.

Fold over a small amount on each of the short sides and iron a crease. I cut a piece of hem tape in half to fit into the smaller space. If you don’t want the fringe on the end, go ahead and hem one of the long sides too.

how to make burlap table runner

Let’s begin on the ruffle. You’ll be doing this on one long side (un-hemmed). Fold over about 1/4” and iron a crease. With the right side facing up, pinch the fabric to create a pleat and use small pieces of hem tape to tack it down with the iron.

Ruffles not your thing? Try edging with ribbon or lace.

diy burlap table runner

ruffle burlap table runner

Continue pleating the fabric until the end, like so:

no sew burlap table runner

It doesn’t have to be perfect, especially if you’re using a rustic fabric like burlap or canvas! Turn your ruffle over and insert pieces of hem tape under your new folds and iron them down from the back. To attach the ruffle, lay both wrong sides up and line up the edges. Tack both edges down with hem tape, then work in the rest. Even if it’s not a perfect fit, you should be able to squeeze in your ruffles and iron them in place with pieces of tape. If you’ve left your bottom edge un-hemmed (like I did), be sure to stop the fraying action with some fabric glue like this.

stitch witchery table runner

Repeat with the other side, and you’ll be on your way to the cutest table decor on the block!

***Linked Up***

tatertots & jello

funky junk saturday nite special

iheartnaptimebuttonsundayscoop

Read Full Post »

Tutorial: Spray Painting

If you caught a glimpse of my Baker’s Rack on the back balcony, you’ll understand the need for this tutorial. Basically the whole area needed a makeover, but we’ll start with the repainting of the rack.

Let’s go ahead and show you the “before” shot.

The first rule of spray painting: you will always need more than you think, and likely more than you buy. So grab a few extra cans…you can always return them and you’ll be thanking yourself for not having to stop in the middle of a project to get more.

I wanted a soft ivory for my Baker’s Rack, so I chose Krylon’s White Primer and Ivory Satin paint.

First I cleaned the rack, then sanded down the spots that were rusty. Preparing the surface is a critical step-make sure you take time to sand and prime no matter what surface you are working with. After wiping down with a damp rag and allowing to dry, I began with the primer. You want to keep the can about 6 inches away from the surface and move in sweeping motions. Don’t try to get complete coverage in 1 or 2 coats, just keep applying paint in light sweeping coats, and it will eventually get a nice finish-trust me! After priming here is what the rack looked like.

Once the primer is dry (it didn’t take very long in the heat here!), you can begin with your main color. I used 3 cans of the ivory before I achieved the finish I wanted. Here it is all cleaned up in its home- I made sure to clean the vinyl siding and the floor before putting the rack back-no halfway jobs here!

And now, with some $0.99 plastic storage bins and a few relocated plants. Our chimney starter needs a new coat of paint as well-stay tuned for a tutorial on restoring rusted items!

Read Full Post »

Older Posts »